Sometimes there is no substitute for booting a computer to gather data. But the forensic consequences of directly booting the system under investigation are prohibitive. And, while it can be possible to restore a computer image to another hard drive and install that drive in the computer hard drive for booting, this can be costly, very time consuming, and you only get one shot before you've changed the data from original (and repeated boots may be desirable depending on the investigation).
In response to this, tools like LiveView were created. The concept was to boot the forensic image, rather than restore it, and capture all system changes in a disk cache. The operating system could be booted quickly and repeatedly from an original state. However, I never found LiveView to be very effective, and it the past few years I have avoided Windows-based tools whenever possible
Enter xmount by Dan Gillen. Xmount will mount raw (dd), Expert Witness Format (ewf, aka, EnCase), and possibly Advanced Forensics Format (aff) images and create a virtual disk that can be run in a virtual machine. Supported virtual disks are raw (qemu), vdi (VirtualBox), and vmdk (VMware). Xmount is easy to use: its as simple as invoking the command, listing the image type, the virtual disk type desired, assigning a disk cache file, and selecting the disk image to mount. For example:
$ sudo xmount --in ewf --out vdi --owcache disk.cache image.E?? /mntOf course, you've only come partway to actually booting that image. You could try to boot the virtual disk in your virtual machine, but if it's a Windows operating system, chances are it will fail.
Open the Flood Gates with "opengates"
Windows operating systems rely on the hardware of the system in which they are installed to boot. Thus, you cannot normally remove a hard disk drive with a Windows operating system, install it in a differently configured system, and expect it to boot. Thus, neither will your virtual disk boot in your virtual machine, unless the configuration of the virtual machine closely matches that of the original system. However, xmount creator Dan Gillen has a solution for us: "opengates."
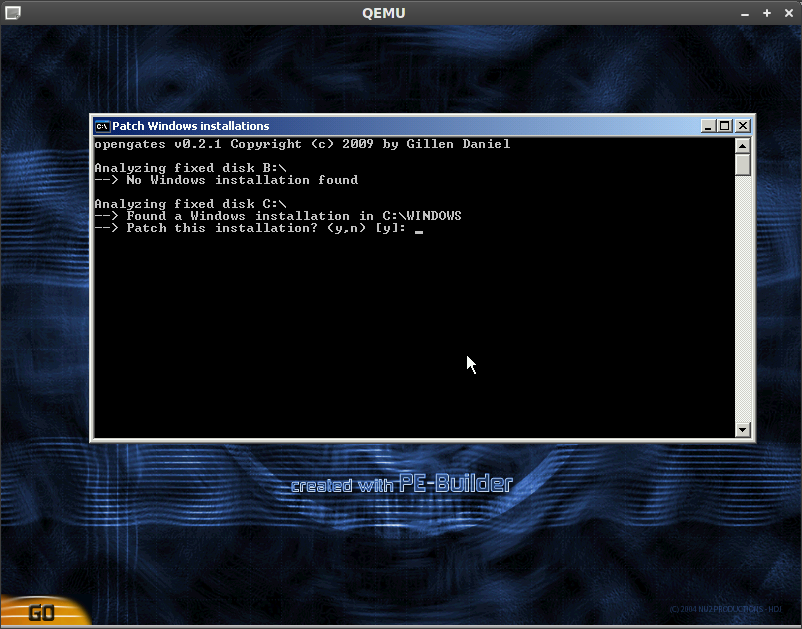
Opengates is a utility to overcome the hardware limitations of Windows Operating systems. It does several other things to make the virtual disk bootable, but one most interesting and useful capability is the removal of user passwords. Opengates is deployed with BartPE, a bootable live windows environment. Gillen provides very clear instructions for creating an opengates enabled BartPE disc with PEbuilder. But in short, you need a Windows XP or 2003 machine (to run PEbuilder), a licensed Windows XP install disc, the opengates software, and about 10 minutes.
Configuring the VM
Qemu
If you are using qemu, the steps to a running VM are pretty short. You simply setup your VM with a CD-ROM and the virtual disk. The CD-ROM contains the BartPE disc (I use an ISO I call opengates.iso). I use the command line thusly:
$ sudo xmount --in ewf --out dd --cache disk.cache image.E?? /mnt
$ qemu -cdrom opengates.iso -drive file=/mnt/image.dd -boot menu=onThe "-boot menu=on" argument allows a boot menu to be selected with F12. I boot initially with BartPE, and opengates runs immediately. You can simply take the defaults for most options, the only catches being user password removal and AntiWPA (a Windows Product Activation) workaround. When opengates is done, it displays some necessary VM settings (but Qemu can't be configured--that I know of--with those settings), and reboots the system.
On the second boot, I boot from the virtual disk. In a recent case, the Windows Vista Business edition did not boot under qemu, however. So, I tried VirtualBox.
VirtualBox
VirtualBox can be deployed immediately, using the changes made with opengates under Qemu if desired. The changes are recorded in disk cache set when mounting, and the cache can be reused with subsequent mounts/boots. However, I'm going discuss VirtualBox as though the whole process was centered around its use.
First, xmount must be used to create the virtual disk:
$ sudo xmount --in ewf --out vdi --cache disk.cache image.E?? /mntNext, start and configure VirtualBox. I recommend the PUEL edition (downloaded from the website) if you plan to use USB, and it is easier to install. Setup your VM, using your opengates enabled BartPE ISO and the xmount virtual disk.

Boot the ISO, either by using the F12 key or by manipulating the boot order in the VM. Use opengates to configure the virtual disk as indicated in the Qemu section above. Be sure to note the VM settings recommended by opengates and configure your VM accordingly. You may not find exact matching settings based on the VM you are using and the version, but it shouldn't be hard to determine and you'll make them in the System tab. Common settings with be "Mother Board | Enable IO ACPI" and "Processor | Enable PAE/NX"
If the OS in your image was in a hibernated state, you'll likely not be able to restore it, but there is no harm in trying. If the OS fails to load the hibernation file, it will delete it and boot normally. If all goes well, you should boot into Windows. Remember, all changes are being cached in your disk cache file.

Snakes in the Grass
A couple of gotchas to look out for:
- Make sure you are using xmount v0.4.4 if you want to use VirtualBox (v3.2.8 or later). A bug in previous versions causes VirtualBox to reject the image.
- Make sure you configure your virtual machine with the settings provided by the opengates utility. For example, I needed to configure my VM to use ACPI before the Windows Vista Business OS in my virtual disk would boot.
- Make sure you put the virtual disk on the IDE controller. Mine was automatically added to the SATA controller, but would not boot.